
- 177
- 11 615 943
Max Imagination
United States
Приєднався 1 жов 2012
Hey, I'm Max! I make videos guiding you how to make electronic circuits, gadgets, and RC vehicles. My goal is to innovate and put skills into practice with hands-on projects, as well as help you do the same, making your childhood dreams come true!
If you are into making, and learning more about such creations, feel free to join by subscribing!
If you want to reach out to me (business inquiries only), my email is in this box below:
⬇⬇⬇
If you are into making, and learning more about such creations, feel free to join by subscribing!
If you want to reach out to me (business inquiries only), my email is in this box below:
⬇⬇⬇
Build an Arduino Pistol-grip Transmitter for RC Cars with 1KM Range!
Learn Electronics by building Interactive STEM Kits (CODE: MAX10) - circuitmess.sjv.io/5gQoGD
Read the transmitter's blog post tutorial with more info on Elektor Labs: www.elektormagazine.com/labs/build-an-arduino-pistol-grip-transmitter-for-rc-cars-with-1km-range
-------------------------------------------
In this video, we build an Arduino-based Grip-style (Pistol-grip) Radio Transmitter for controlling custom RC vehicles.
This 3D printed hobby-grade radio transmitter has a comfortable feel and grip while being straightforward to build and use for anyone looking to control cars, boats, or any other vehicle that takes throttle and steering input with the adaptability of Arduino hardware.
This home-built RC transmitter is ideal to make if you're looking to use up some spare components and your 3D printer. A great DIY alternative for controlling Arduino-based DIY RC vehicles with lots of flexibility in programming and peripheral options.
Original code credits go to @ELECTRONOOBS
Want to instead build a transmitter for drones/planes? Watch Electronoobs' transmitter video here: ua-cam.com/video/YMF5NXeHOnk/v-deo.html
------------------------------
🛠 PROJECT RESOURCES:
🔫 3D design of transmitter's parts: cults3d.com/en/3d-model/game/arduino-grip-style-transmitter-for-rc-cars-and-boats-8ch-radio-controller
♾️ Code files: drive.google.com/drive/folders/16IUUYo5chdUwhnbvL_kc-y5JQW_NhwbZ?usp=sharing
🔌 Wiring diagrams: drive.google.com/drive/folders/12LTnbu4gxuK0598IRukLUNk-_0MgI0eZ?usp=sharing
🧵 Materials, Parts, & Components list (TRANSMITTER):
(x1) Arduino Nano - amzn.to/3x9lRyE
(x1) NRF24L01 + PA + LNA - amzn.to/4egUEuO
(x2) Joysticks - amzn.to/3yTXOo1
(x2) Potentiometers - amzn.to/3RfDiEw
(x2) Toggle switches - amzn.to/4ef1MYh
(x5) Pushbuttons - amzn.to/4eclBzE
(x1) OLED - amzn.to/3Vzdd67
(x1) Buzzer - amzn.to/3KzZyFj
(x4) 3mm LEDs - amzn.to/3XfCtPU
(x2) LEDs for charge indication - amzn.to/45cXL2F
(x1) 5V boost converter - amzn.to/3XbuQd9
(x1) Power switch - amzn.to/3yTaKdK
(x2) 18650 cells - amzn.to/4bNmdKz
(x1) Connector Pair - amzn.to/3yWjTlW
(x6) 10K Resistors (all found in resistor kit) - amzn.to/3ViIRmX
(x1) 3.3K Resistor
(x1) 2.2K Resistor
(x1) 2K Resistor
(x1) 1K Resistor
(x1) 330 Ohm Resistor
(x1) Female header row - amzn.to/3KFX1JH
30AWG wire - amzn.to/3KylmRO
24AWG Wire - amzn.to/4aVleGX
(x18) M3 Threaded Inserts - amzn.to/3Kz4MRL
(x18) M3 screws - amzn.to/3XehJbp
(x2) 5mm Neodymium Magnets - amzn.to/3VwQszx
(x1) Primer Bulb - amzn.to/4c6XQHg
PRINTING:
(x1) Matte Black PLA Filament - amzn.to/4c6wr8g
(x1) Matte Dark Grey PLA Filament - amzn.to/4c8KeLI
3D Printer I use: Creality Ender 3 V2 - amzn.to/45igolH
🧵 Materials, Parts, & Components list (RECEIVER):
(x1) Arduino Pro Mini (5V) - amzn.to/3RiAFC6
(x1) NRF24L01 - amzn.to/45nt2jp
(x1) AMS1117 3.3V - amzn.to/3yRNBbL
(x1) 100nF (104) Capacitor - amzn.to/3yQ7nEm
(x1) 100μF Capacitor (Optional) - amzn.to/3X8ktHc
(x1) 10μF Capacitor - amzn.to/3X8ktHc
(x1) 3mm Red LED - amzn.to/3XfCtPU
(x1) 220 Ohm Resistor - amzn.to/3ViIRmX
(x2) 1 Female and 1 male headers - amzn.to/3KFX1JH
(x1) 4x7cm Perforated Board - amzn.to/3z0CwF2
30AWG wire - amzn.to/3KylmRO
PROGRAMMING:
FTDI USB to Serial Converter with Cable (For Pro Mini) - amzn.to/3Rk70rU
As an Amazon Associate, I earn from qualifying purchases with no added cost to you.
----------------------------------------------------------------------
👉 Tools/equipment I use: sites.google.com/view/maximagination-workshop/ ----------------------------------------------------------------------
☕ Buy me a coffee: www.buymeacoffee.com/MaxImagination ----------------------------------------------------------------------
Instagram: @max.imagination - max.imagination?hl=en Instructables: www.instructables.com/member/Max%20Imagination/ ----------------------------------------------------------------------
Tags:
Max Imagination, DIY, How to, How to make, 3D printed, arduino, arduino-based, transmitter, receiver, RX, TX, radio, controller, radio control, remote control, remote, controller, RC, controlled, arduino nano, arduino pro mini, nrf24l01, rf24, nrf24l01 + PA + LNA, 1KM range, antenna, rc car, rc boat, electronic, battery powered, oled display, 8 channel, 8CH, steering, throttle, pistol-grip, grip, grip-style, gun-style, vehicle, model, 3D, nrf24, hobby grade, long range, tutorial, wireless, custom, long distance, build guide, PWM, proportionate, joystick, wheel.
#arduinotransmitter #rccars #nrf24l01 #arduinoreceiver #Uppbeat
Переглядів: 27 894
Відео


Make a TINY Arduino Drone with FPV Camera - Will It Fly?
Переглядів 598 тис.2 місяці тому
Shop for your project’s parts at DFRobot.com: www.dfrobot.com Gochifix Scope & Meter - Code: 25Imagine: amzn.to/3Jtk9uy Learn more about the Arduino Drone on the Elektor Labs blog post: www.elektormagazine.com/labs/make-a-tiny-arduino-drone-with-fpv-camera In this exciting tutorial, we make a tiny, brushed Arduino FPV (First Person View) drone from popsicle sticks. Learn how to set up and confi...
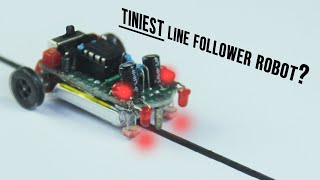
Make the TINIEST Line Follower Robot without a Microcontroller!
Переглядів 293 тис.4 місяці тому
Fuel Your Maker Dreams with Educational STEM Kits (CODE: MAX10) - circuitmess.sjv.io/5gQoGD Learn more on my blog post about the Line Follower: www.elektormagazine.com/labs/make-the-tiniest-line-follower-robot-without-a-microcontroller-1 In this step-by-step guide, I’ll demonstrate how to build an incredibly small yet efficient line-following robot using basic electronics. No microcontroller or...

Build this 3D Printed RC Jet Boat In One Day!
Переглядів 31 тис.5 місяців тому
➡️ Explore the JLCMC Mechatronic Parts Shop - jlcmc.com/?from=Image 💡 Turn your ideas to reality with JLCPCB - jlcpcb.com Looking to build a quick project with a touch of adrenaline? You've come to the right place! My step-by-step tutorial will guide you through the process of crafting your very own mini RC Jet Boat, ensuring a smooth and enjoyable building experience for all skill levels. 🚤 Ke...

Make a FPV RC Paper Airplane That Flies | ESP32
Переглядів 142 тис.6 місяців тому
👁️ Equip the XIAO ESP32S3 Sense Camera to your projects - www.seeedstudio.com/XIAO-ESP32S3-Sense-p-5639.html? Or on Amazon: amzn.to/48GUlWl Turbocharge your XIAO camera's abilities with Seeed's SenseCraft AI platform - sensecraft.seeed.cc/ai/#/home? Purchase the TS101 Pocket Soldering Iron here - www.amazon.com/dp/B0BH8TKLG4 In this video, you learn how to convert an ordinary paper airplane int...

Build Two Mini Arduino Battle Bots that FIGHT | 3D Printed
Переглядів 19 тис.7 місяців тому
Buy the new Arduino UNO R4 WiFi here: store.arduino.cc/products/uno-r4-wifi Level up your content game with the Hohem iSteady M6 Phone Gimbal: gotvoom.thtk.cc/16923952938707 CODE: XOTI9BW6 (5%)from 2023-11-05 to 2023-11-30 TS101 Pocket Soldering Iron - amzn.to/45SCYk0 Hey, guys! In this video, I show you how I designed, 3D printed, and assembled two Arduino model combat robots from the well kno...
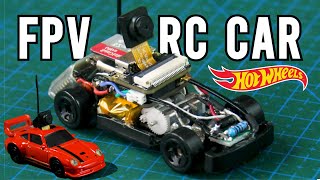
Transform Your Hot Wheels into a micro FPV RC Car!
Переглядів 582 тис.9 місяців тому
Transform Your Hot Wheels into a micro FPV RC Car!

Building the Ultimate 5-inch FPV Freestyle Drone
Переглядів 146 тис.Рік тому
Building the Ultimate 5-inch FPV Freestyle Drone

Making the most EQUIPPED DIY Security Camera with ESP32-CAM
Переглядів 341 тис.Рік тому
Making the most EQUIPPED DIY Security Camera with ESP32-CAM
ESP32-CAM - Guide to making YOUR first DIY Security Camera
Переглядів 389 тис.Рік тому
ESP32-CAM - Guide to making YOUR first DIY Security Camera
Create an Arduino Music Player with Piezo Buzzers | Birthday Melody
Переглядів 27 тис.Рік тому
Create an Arduino Music Player with Piezo Buzzers | Birthday Melody
Build a DIY RC Car with Steering Under $20
Переглядів 836 тис.Рік тому
Build a DIY RC Car with Steering Under $20
How I built my own FAST PC to Level up Video Production | DIY Budget Computer Build
Переглядів 3,3 тис.Рік тому
How I built my own FAST PC to Level up Video Production | DIY Budget Computer Build
How to make RC Car Steering that Self-centers - Front Axle | Toy-grade Mechanism
Переглядів 396 тис.Рік тому
How to make RC Car Steering that Self-centers - Front Axle | Toy-grade Mechanism
Build an Arduino Flying Wing RC Plane | DIY Sweptback Wing
Переглядів 103 тис.Рік тому
Build an Arduino Flying Wing RC Plane | DIY Sweptback Wing
Build the Ultimate Bench Power Supply for Electronics
Переглядів 251 тис.2 роки тому
Build the Ultimate Bench Power Supply for Electronics
Reviving Razor E300 Electric Scooter: Part 2 - Upgrades and Restorations
Переглядів 15 тис.2 роки тому
Reviving Razor E300 Electric Scooter: Part 2 - Upgrades and Restorations
How to get set up with Raspberry Pi | + UPi Monitor | Maker's Must-have Workbench Mini PC
Переглядів 4,6 тис.2 роки тому
How to get set up with Raspberry Pi | UPi Monitor | Maker's Must-have Workbench Mini PC
Build a DIY 24V E-scooter Battery Pack | Razor E300 Upgrade (Part 1)
Переглядів 47 тис.2 роки тому
Build a DIY 24V E-scooter Battery Pack | Razor E300 Upgrade (Part 1)
How I fixed my Mavic Pro Drone after crash | Gimbal & Camera Repair Tutorial
Переглядів 16 тис.2 роки тому
How I fixed my Mavic Pro Drone after crash | Gimbal & Camera Repair Tutorial
Build a 1000W Battery Spot Welder Using a Microwave Transformer | Step-by-Step Guide
Переглядів 30 тис.2 роки тому
Build a 1000W Battery Spot Welder Using a Microwave Transformer | Step-by-Step Guide
Make a POWERFUL Stun Gun for Self Defense | DIY
Переглядів 320 тис.2 роки тому
Make a POWERFUL Stun Gun for Self Defense | DIY
Build your own Arduino RC All-Terrain Rover with NRF24L01 | DIY RC Robotic Car Tutorial
Переглядів 30 тис.2 роки тому
Build your own Arduino RC All-Terrain Rover with NRF24L01 | DIY RC Robotic Car Tutorial
Make a DIY Solar Power Bank that folds!
Переглядів 19 тис.2 роки тому
Make a DIY Solar Power Bank that folds!
Make a Simple WiFi Security Camera with ESP32-CAM
Переглядів 337 тис.2 роки тому
Make a Simple WiFi Security Camera with ESP32-CAM
DIY Camera Remote Shutter Controller | Arduino-based Accessory | Innovative Recording Device
Переглядів 2,8 тис.3 роки тому
DIY Camera Remote Shutter Controller | Arduino-based Accessory | Innovative Recording Device
Make Your Own Fast RC Mini Racing Drone!
Переглядів 93 тис.3 роки тому
Make Your Own Fast RC Mini Racing Drone!
DIY Arduino Weather Station | Make a Pocket Weather Device to Monitor Environment
Переглядів 7 тис.3 роки тому
DIY Arduino Weather Station | Make a Pocket Weather Device to Monitor Environment
Build an Arduino Radio Transmitter & Receiver for RC Aircraft & Vehicles
Переглядів 135 тис.3 роки тому
Build an Arduino Radio Transmitter & Receiver for RC Aircraft & Vehicles
How to make a STEAMPUNK 35W Incandescent FLASHLIGHT | DIY Powerful Emergency Torch
Переглядів 3,9 тис.3 роки тому
How to make a STEAMPUNK 35W Incandescent FLASHLIGHT | DIY Powerful Emergency Torch
Hello how many kilometers it will fly
The return of the third reich.
Wow…you’re a genuine DIY…hats off to you…this is old school DIY…it’s reasons like this an enemy would be insane to invade the U.S. homemade drones, mechas, lasers, etc…
Cant wait to see it complete.
I need more information!! 😮
acho que vale pelo conhecimento... porem com o valor do projeto da pra comprar um controle com receptor ja pronto de boa qualidade. obrigado pelo video.
Please make a similar drift car which can be controlled via smartphone using Wi-Fi . Love you from India ❤
Software name?
Cool stuff, waiting for part 2.
Need full tutorial with all 3d printed parts model
Bro is literally showing benefits of a 3d printer
WAITING FOR YOUR VIDEO MAXXXXX😊👌👌
Oh wow, I’m doing an rwd small scale right now but this is awesome dude. You’re on the level!!!
I am highly inspired from you Bug brother...i am from india...it is one of my childhood dreams to fly something....you showed me the way to it...Thanks for that, but does this drone really fly at a speed of 35km/h ?
Great stuff man, I ❤ tech
Wow new project! great to see max❤🎉
You handsome and Big, long, tall
Bruv you have mad technical skills. Is this Autodesk professional, AutoCAD or fusion 360 ?
Oke my brother and my yutubers
We're waiting bro ❤❤
Great Max.!
I'm scared
💀💀💀 insane
Great project bro👏how old are you and what is your country?
U should put that on cults you’d make a fortune
Or it’d just be pirated. The best STLs are never wasted on the masses.
I have made a remote for rc plane using your previous video. Can i use that for upload this code it don't have a display. Can i use it for this code without display? Thak you.
Could you really make this with stuff from old devices?
Bout or a sabmarien
Why is the circuit board getting hot
Why do you need an IR reciever when you have an LDR sensor?
❤❤❤ very simple connection ❤❤❤
𝙒𝙝𝙖𝙩 𝙮𝙤𝙪 𝙝𝙖𝙫𝙚 𝙪𝙨𝙚𝙙 𝙩𝙤 𝙥𝙧𝙤𝙫𝙞𝙙𝙚 𝙨𝙪𝙥𝙥𝙤𝙧𝙩 𝙙𝙧𝙤𝙣𝙚
Wire tracks.
This is the kind of thing that I find simply impressive, congratulations, long live electronics... ⚡BR
I appreciate that! Thanks! Stay tuned for the next video by enabling the notification bell 😊
but the real question is does it hurt, not like a jump enough to protect yourself?
It hurts enough to give people a shock and perhaps sometimes fall to the ground if done right. However, it's not lethal.
Треба запитати Стерненка шо думає з приводу такого типу і розміру фпвшок
Great tutorial
I appreciate that! Stay tuned for the next video by enabling the notification bell 🛎
The heavy battery should be attached "on the bottom", for keeping the drone center of gravity, as lowest as possible.
Not necessary. It's also an FPV drone, the battery is normally on top.
And helicopters should have, their propellers under them, too...
The diagram isn’t coming up
Check the pinned comment for the link to download.
Hi! I have built drone and I'm using mpu6050 for gyro but my drone is not stable it's getting crash everytime or sometimes it flips down i don't know what is the issue hsere can you help?
DM me on Instagram for help: @max.imagination The issue could either be improper PID that you would need to tune or something wrong with the motor configuration.
@@MaxImagination okay thank you ☺️
What size is the parts of the cardboard?
Around 25x14cm.